The Perfect Tummy Time Play Blanket & Crinkle Toys
As any new parent knows, tummy time is the best time. It is such a crucial part of baby’s development. As an experience educator, I know how important it is to build those strong muscles and fine motor skills. Therefore, creating a bright, cozy and engaging environment for tummy time can make this essential activity enjoyable for both you and baby! What better way to do this than by using Riley Blake’s new designer flannel fabric lines to craft the perfect tummy time play blanket and matching crinkle toys.
Why Choose Riley Blake’s Designer Flannel Fabric?
Riley Blake Designs is renowned for their high-quality fabrics and stunning designs. Their new flannel line, designed by RBD Designers, is no exception. Here are a few reason why their Designer Flannel is the ideal choice for your baby projects. First of all, “oh my goodness”, this flannel is incredibly soft, making it gentle on your baby’s delicate skin. The flannels are warm and cozy, ensuring baby stays comfortable during tummy time. This flannel is made to last, believe me, I’ve put it through the paces. Riley Blake’s flannel are known to be durable and can withstand frequent washing, so brings on the “burps and giggles!” Lastly, the designs are beautiful from soft pastels to warm animal prints to bold trains and planes this new designer line features an array of charming patterns and colors that are visually stimulating for babies and little ones of all ages. Mom and educator approved!
Crafting the Tummy Time Play Blanket
Creating a tummy time play blanket is a fun and rewarding project, perfect for both a beginner and experienced crafters. For this project, I used Alphabet Zoo by Dani Mogstad with PoParazzi Flannel Basics by RBD Designers to piece together the perfect tummy time play blanket and crinkle toys. These projects are both functional and beautiful. Here’s a step-by-step guide to help you make the perfect set for your little one.
Materials
- 1.5 to 2 yards of Riley Blake designer flannel fabric.
- Coordinating cotton fabric for backing (optional)
- Batting (optional, for added cushion)
- Sewing Machine and basic sewing supplies (thread, ruler, scissors, pins & rotary cutter)
- I used die cutters to cut letters, banner shapes and circles (optional)
- Binding, if making a quilt sandwich (pre-made or DIY with coordinating fabric)
- I used the Self-Binding Method for this project. No worries, I will explain.
Instruction
- Cut the Fabric: Determine the size of the blanket you want to make. A most tummy time (baby) blanket size is about 36×36 inches. If you are using whole cloth, cut to your desire size. I wanted to piece my blanket to add texture, I cut 8 inch squares. I used my die cutters to cut letters, pendent shapes, circles and numbers to add to my blocks. I used a blanket stitch to outline the objects. I also added woven ribbon loops to blocks to use for attaching sensory objects. Here’s where you can be as creative as you want! Added different color woven ribbons to make loops.
- Piecing – layout your rows, once you have them the way you like, label your rows. Take your rows to the sewing machine and sew your rows using a 1/4 inch seam. If you are adding woven ribbons, place where you want them on the block and sew within the 1/4 inch seam as you sew your blocks together. I added 3 inch borders on all four sides of my blanket top to give it a little more size and character.
- Quilting
- Layer the Fabrics whole cloth or pieced top (if using backing and batting): Place the backing fabric face down, the batting on top, and flannel fabric face up on top of the batting. Smooth out any wrinkles and pin (base) the layers together. Quilting the layers together you have stitch straight lines, a grid pattern or even free-motion quilt for a more decorative look and added texture – which is what I love to do!
- Self-Binding Method that I used, see below, layer to blanket top and backing right sides together. You will need to smooth out your fabrics, pin or clip around the edges. You will sew around the the entire layer top leaving a 6 inch opening for turning the blanket. TIP-mark the opening, start sewing, back stitch, travel away from the marked opening around the layered top until you get to the next mark, back stitch, you will have a 6 inch opening for turning the blanket.
- Turn and Finish the blanket – reach in through the opening pull the insides out. Smooth the blanket, be sure the opening seams are tucked in, pin or clip. Then sew a straight or zigzag top-stitch around the entire blanket. PERFECT! Look at your beautiful work and get your camera ready to capture some amazing tummy time moments. Your blanket is READY!
- Note: I used a fleece has my backing option and choose not to add batting since I wasn’t quilting the blanket.
- Turn and Finish the blanket – reach in through the opening pull the insides out. Smooth the blanket, be sure the opening seams are tucked in, pin or clip. Then sew a straight or zigzag top-stitch around the entire blanket. PERFECT! Look at your beautiful work and get your camera ready to capture some amazing tummy time moments. Your blanket is READY!
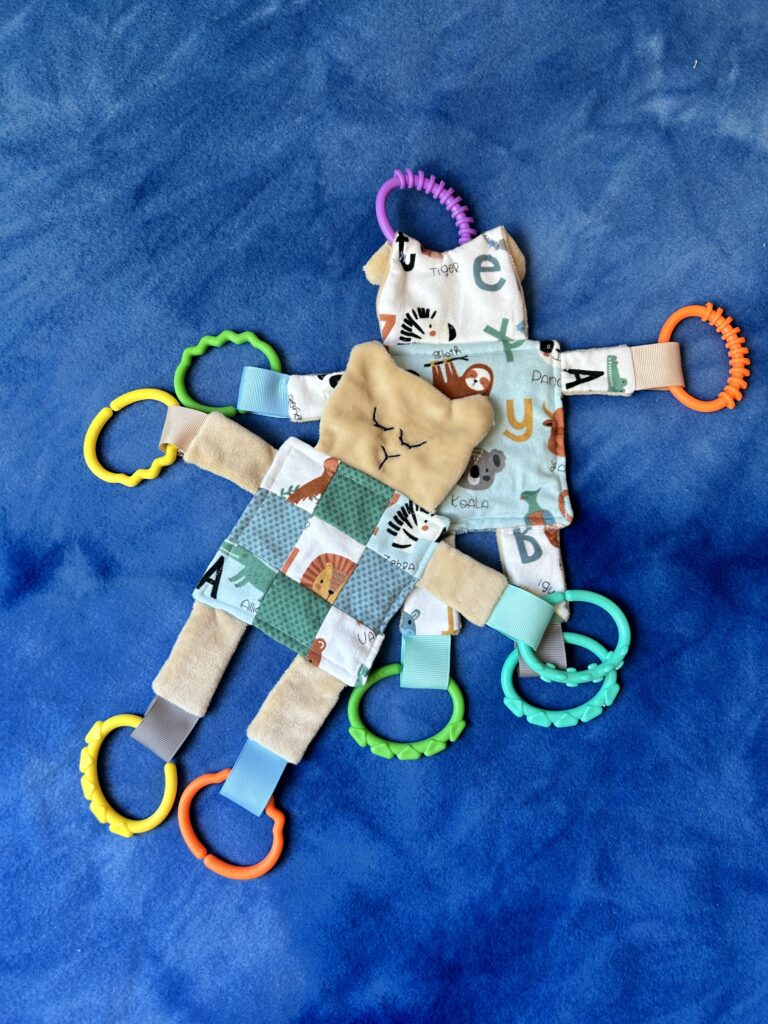
Creating Crinkle Toys
Crinkle toys are fantastic for sensory development and can keep baby entertained and cooing during tummy time. They are so simple and fun to make! I will share how I made my adorable “match” crinkle toys using my Riley Blake flannel fabric scraps. I used the Bear and Bunny Crinkle Baby Softie Toy Sewing Pattern by preciouspatterns, but you don’t need a pattern. You can make simple but fabulous 6×6 Square Crinkle Toys. Okay, here we go….
Materials Needed:
- Riley Blake Designer Flannel fabric scraps — you got’em so use them! No waste.
- Crinkle material (you can use washed and santized snack bags or purchase crinkle material from a craft store).
- Sewing machine and basic sewing supplies.
- If using a pattern, make sure you gathered any additional supplies that maybe listed.
Instructions:
- Pattern – follow the directions as given and admire your GREAT WORK!
- 6X6 Square Option – Cut the fabric and crinkle material. You can cut the flannel fabric into squares or other fun shapes (about 6×6 inches works well). Cut the crinkle material slightly smaller than the fabric pieces.
- Assemble the Layers: Place two pieces of flannel fabric right sides together, with the crinkle material on top. Pin or clip the layers together.
- Sew the Toy: Sew around the edges of the fabric, leave a small opening for turning. Trim the corners to reduce bulk.
- Turn and Finish: Turn the toy right side out through the opening. Use a point turner or chopstick to push out the corners. Topstitch around the entire toy, closing the opening and securing the crinkle material inside.
- Add Extra Features (optional but fun): You can sew in ribbon loops or tags for added senory fun.
It is time to Enjoy Your Beautiful Creations
With your Riley Blake flannel fabric tummy time play blanket and crinkle toys, featuring Alphabet Zoo Designer Flannel, you’re all set to provide a cozy, engaging environment for your baby’s tummy time. These handmade items were made with love and are not only practical but also adds a personal touch to your baby’s playtime.
Crafting these projects is a wonderful way to create lasting memories. Plus, I personally love the satisfaction of knowing I’ve made something special and unique for my little ones. Enjoy every moment!
Happy Crafting!
Jeresther – (Wife, Mom & Educator)


You May Also Like
Through the Woods Quilt Kit
Buds & Butterflies by Cayla Naylor